Vercel AI SDK 的 GenUI 功能
讀完 OpenUI 和 A2UI,再來看 Vercel AI SDK UI,會感受到明顯的落差。大致上,Vercel 目前的 Generative UI 功能,只是把一次 tool call 的結果直接映射到一個 React 元件來渲染。
以本章查天氣的 Demo 為例,在 Vercel 這套流程裡,模型拿不到任何元件 catalog,也不必決定一張卡片裡要放幾個 Row、Text 或 Button。它單純從 tools 中選出 weather,產生查詢參數,前端在回傳的 stream 裡看到 tool-weather part 後,再顯示一張已經寫好的天氣卡片。
本章把這種典型結構概括為:
Tool -> Semantic Component 的映射式 GenUISemantic Component 並非 AI SDK 裡的正式型別,只是本章為了比較而採用的稱呼,指的是天氣卡片、股票卡片、訂單卡片這類帶有完整業務語意的元件。它們的版面、樣式和內部互動都已經寫在應用程式裡,粒度遠大於 Card、Icon、Text 這些基礎元件。
AI SDK 允許 tool 和元件採用多種對應方式:一個 tool 可以只顯示文字,多個 tool 也可以共用 renderer。不過官方教學和 Vercel 自己的 Chatbot 都採用很直接的寫法:每種 tool-${toolName} part 都在前端分支裡映射到一張對應的 Semantic Component。因此,在本章討論的範圍內,可以粗略把它看成一條近似一對一的路線。
Tool 到 Semantic Component
下面分別從模型端和應用端來看。模型端先取得 prompt、conversation history 和 tool contract。以本機天氣 demo 為例,傳給 model adapter 的主要內容如下:
system: You are a concise weather assistant.
        Use the weather tool when the user asks for weather.

user:   Show Singapore weather

tool:   weather
        description: Display a rich weather card for a city.
        input: { city: string /* City name to look up. */ }
input 來自 tool 的 Zod inputSchema,AI SDK 會將它轉換成 JSON Schema,再交給 model provider。模型可以據此輸出:
weather({ city: "Singapore" })到這裡,模型對 UI 的決策就結束了。rich weather card 只是 tool description 裡的能力說明,沒有告訴模型圖示要放在哪裡、溫度該用多大的字級,也沒有把 WeatherCard.tsx 傳給模型。
應用端則是另一段一般的 React 程式碼:
if (part.type === 'tool-weather') {
  return (
    <WeatherCard
      input={part.input}
      output={part.output}
    />
  );
}
WeatherCard 裡固定使用了天氣、位置、溫度、濕度和風速圖示,也固定了頂部 hero、三欄指標和底部摘要的版面。換句話說,AI SDK 負責把 weather tool 的輸入、輸出和執行狀態傳到瀏覽器;卡片樣式則固定在應用程式碼中。
當然,應用端若自行定義一個 renderUI tool,並在 input schema 裡放進完整元件樹,理論上也能繼續往基礎元件組合的路線延伸;這套 catalog、schema、parser 和 renderer 需要應用自行實作,等於自己再實作一套 A2UI/OpenUI。
核心互動結構
UI 表達雖然很簡單,tool call 從模型走到 React 的過程,並非直接傳一個 JSON 就結束。AI SDK 在模型訊息、前端訊息和串流傳輸之間,加入了一層相當完整的狀態轉換:
Browser input
  -> UIMessage
  -> ModelMessage + Tools
  -> streamText / ToolLoopAgent
  -> tool call
  -> tool execute
  -> tool result
  -> UIMessageChunk
  -> SSE
  -> useChat
  -> typed tool part
  -> Semantic Component

tool result
  -> 下一輪 ModelMessage
  -> 模型繼續解釋或呼叫其他 tool
和分析 A2UI 時一樣,我們先認識幾個核心物件,降低理解成本:
Tool:提供給模型的一項語意能力,主要由 name、description、input schema 和可選的execute()組成。它描述「可以做什麼」,不會描述 React 元件的內部版面。ModelMessage:實際進入模型上下文的訊息,包括 system instructions、使用者輸入、assistant tool call 和 tool result。UIMessage:前端使用的對話狀態。除了文字,它還能容納 reasoning、tool parts、custom data 和 metadata。UIMessageChunk:伺服器逐步傳給瀏覽器的傳輸單位,例如text-delta、reasoning-delta、tool-input-available、tool-output-available和自訂 data part。typed tool part:useChat合併 chunks 後得到的前端物件。靜態 tool 會形成tool-${toolName}型別,例如tool-weather。useChat:接收 UI message stream,把零散的 chunks 合併回messages,再觸發介面重新渲染。搭配 transport 和伺服器端的 resume 機制,還能接續一條中斷的 stream。
typed tool part 還有一組可直接供 UI 使用的狀態:
input-streaming
input-available
output-available
output-error
approval-requested
前端可以在參數尚未完整產生時顯示 skeleton,在 tool 執行時顯示 loading,取得 output 後切換成結果卡片,失敗或需要使用者核准時則顯示其他狀態。此外還有 approval-responded、output-denied 等狀態,下文的核准流程會用到。AI SDK 把 chat-like UI 最常見的 tool execution lifecycle 整理成前端可直接使用的狀態;A2UI 的 Surface、Catalog、Data Model 和 Action 則不在這套抽象中。
天氣卡片 Demo
為了看清楚這些中間產物,我做了一個本機天氣 demo。實驗採用 [email protected] 和 @ai-sdk/[email protected],模型部分替換成 deterministic mock streaming model,確保每次都能重現相同的 tool call 和執行紀錄。
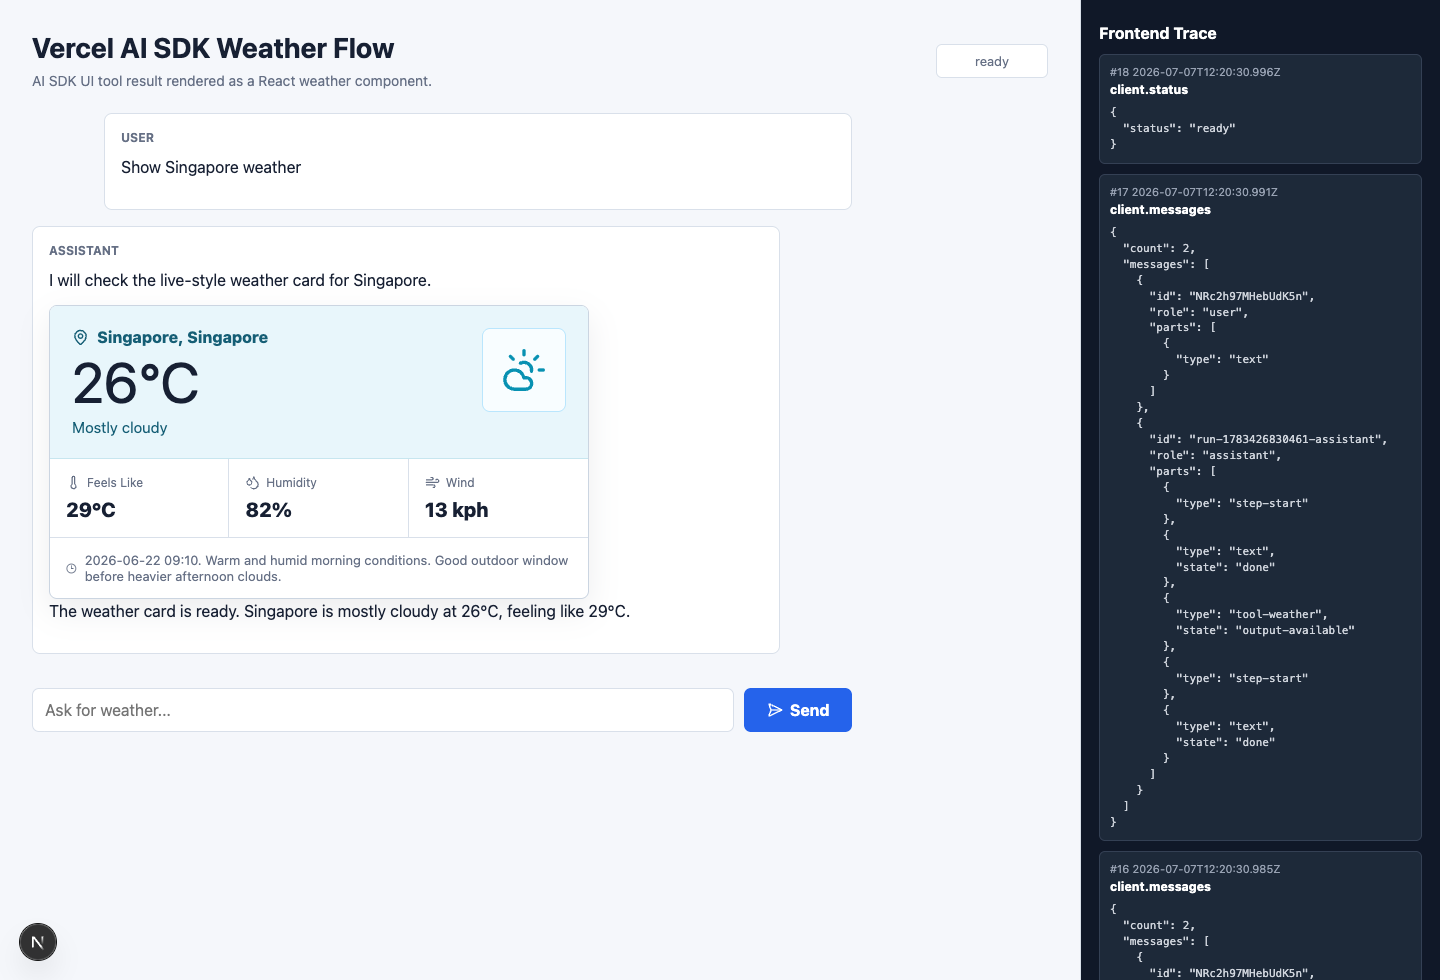
使用者輸入 Show Singapore weather 後,瀏覽器先透過 useChat 和 DefaultChatTransport 傳送一則 UIMessage。伺服器將它轉換成 ModelMessage,連同 weather tool 一起交給 ToolLoopAgent。
本機 mock model 的第一輪 stream 會輸出一句文字和一次 tool call:
{
  "type": "tool-call",
  "toolName": "weather",
  "input": {
    "city": "Singapore"
  }
}
這裡需要說明實驗邊界:mock model 直接寫死了 weather 和 Singapore,並未真的讀取 prompt 再選擇 tool。這次實驗檢查的是 tool call 如何進入 UI stream,不用來判斷某個真實模型能否穩定選對 tool。
weather.execute() 是一個 async generator。它先 yield loading,再回傳完整的天氣資料:
async *execute({ city }) {
  yield {
    state: 'loading',
    city,
    message: `Fetching ${city} weather...`,
  };

  yield {
    state: 'ready',
    city: 'Singapore',
    temperatureC: 26,
    feelsLikeC: 29,
    humidity: 82,
    windKph: 13,
  };
}
AI SDK 將這些 model/tool stream parts 轉換成 UI message chunks。擷取幾筆關鍵輸出,可以看到 tool input、暫時的 loading 和最終結果沿著同一條 SSE 依序抵達:
{"type":"tool-input-available","toolName":"weather","input":{"city":"Singapore"}}
{"type":"tool-output-available","output":{"state":"loading","city":"Singapore"},"preliminary":true}
{"type":"tool-output-available","output":{"state":"ready","city":"Singapore","temperatureC":26}}
useChat 不需要理解天氣資料的處理邏輯,它只負責把這些 chunks 合併成一個 tool-weather part,並隨著 input-available、output-available 等狀態變化觸發 React 重新渲染。頁面程式碼辨識到 tool-weather 後,再把 input 和 output 交給 WeatherCard。
tool result 還會被放回下一輪 ModelMessage。模型因而知道新加坡是 26°C,可以繼續輸出一句摘要,也可以根據結果呼叫下一個 tool。一份結果在這裡有兩個消費者:React 用它繪製卡片,模型用它繼續目前的 agent loop。
Vercel 官方的天氣範例也採用相同的組織方式:定義 displayWeather tool,回傳 location、weather 和 temperature,前端遇到 tool-displayWeather 後手動渲染 <Weather {...part.output} />。Vercel 開源的 Chatbot 也把 getWeather output 映射到預先寫好的 <Weather /> 元件。替換資料欄位和元件樣式後,流程基本上沒有變化。
元件裡的按鈕如何繼續
從介面效果來看,官方範例常見 confirmation 和 approval 兩類互動,不過它們在 SDK 裡的層級不同。approval 是 tool lifecycle 的內建狀態:伺服器端 tool 要求核准後,前端會收到 approval-requested,按鈕透過 addToolApprovalResponse() 回傳允許或拒絕。允許後會繼續執行原本的 tool,拒絕則得到 output-denied。
SDK 對 confirmation 的做法是自訂 client-side tool,而非另一種內建 action。官方的 askForConfirmation 是一個沒有 execute() 的自訂 client-side tool:模型先呼叫它,應用中預先寫好的 React 元件顯示確認按鈕,使用者點擊後再用 addToolOutput() 把選擇寫回這次 tool call。
askForConfirmation -> input-available -> 使用者點擊按鈕
  -> addToolOutput() -> output-available -> 下一輪模型呼叫

server tool -> approval-requested -> 使用者允許或拒絕
  -> addToolApprovalResponse() -> 執行原 tool / output-denied
其他自訂按鈕行為也需要預先寫進對應的 Semantic Component。按鈕可以修改本機狀態、呼叫業務 API、用 sendMessage() 發起新一輪對話,或透過上面的 API 補齊目前的 tool call。應用還要設定自動送出條件,或手動呼叫 sendMessage(),才能讓模型繼續處理。下一輪取得 tool result 或 approval result 後,模型再決定是否呼叫另一個 tool;新的 typed tool part 仍由前端映射到預先寫好的元件。
簡單帶來的工程價值
這條路線在 UI 表達層可研究的內容不多。模型產生的是 tool call;基礎元件結構、資料繫結和局部 UI 更新並未形成獨立協定。不過,它把 agent 和前端之間一批瑣碎的連接工作收進統一的 message stream。
text、reasoning、tool input、tool output、custom data 和 metadata 可以沿著同一條 stream 抵達瀏覽器。useChat 負責增量合併 message parts,並讓 React 根據最新狀態重新渲染;搭配持久化、transport 和 resume 介面,應用也不必為每一種內容重新設計一套串流協定。
串接成本同樣很低。一個已經存在的 Web 產品,只要新增 tool 和預先定義的元件,再把 output 傳給現有元件,就能在對話裡用預先定義的 UI 元件顯示 agent 的執行結果。